

How to crochet a poncho
Crochet is a creative and relaxing technique for transforming your skeins of wool, cotton, or acrylics into unique garments. With few materials and a little patience, you can create pieces as original as the crochet poncho we want to tell you about today.
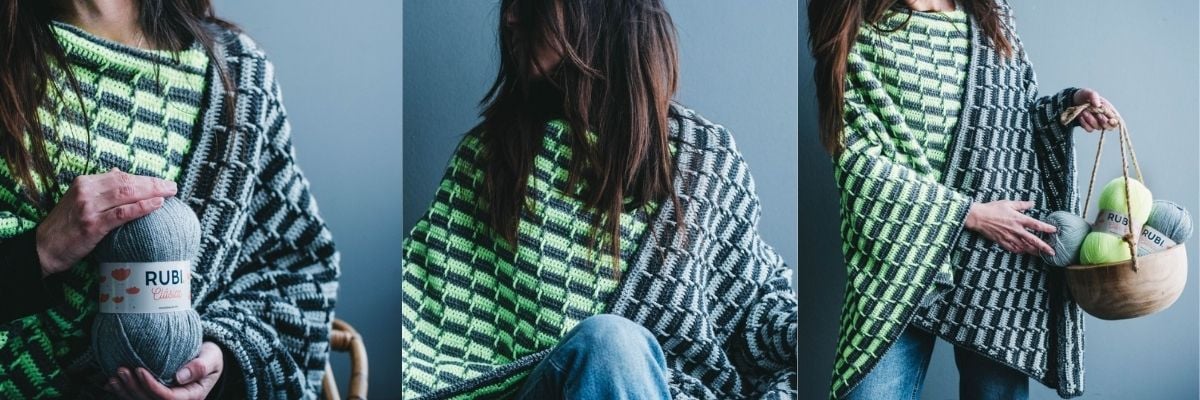
This two-piece construction is incredibly versatile. And also, very original! Don't you love that fusion of staggered stitch with vibrant colors like that of Rubí Clásica in shade 101?
In this step-by-step article, we will guide you on how to make a crochet poncho.
Essential materials: what do you need to get started?
Before you start knitting this crochet poncho, it is essential that you gather all the materials you need. Here is the list:
Easy-to-handle yarns
Our Rubí Clásica quality is perfect for projects like this crochet poncho. Besides being super easy to knit, its variety of colors will make it difficult for you to choose. That's right, you'll want them all!
For this crochet poncho, we have used shade 042 as the base. And to give it a fun touch, we have chosen 101 from our range of fluorescent colors.
Crochet hook
A 5.0 mm hook is ideal for this crochet poncho. Its measurements are perfect for the thickness of Rubí Clásica yarn.
Additional tools
- Measuring tape to accurately measure the pattern rectangles.
- Stitch markers, which, although optional, are very useful for ensuring the correct joining of the pieces.
- Scissors and a tapestry needle are essential for finishing and final details.
Pro tip: before starting the project, make a swatch with the chosen yarn and hook. This will help you adjust the tension of the fabric, avoid errors, and anticipate the behavior of the material.

Let's get started! We'll tell you step by step how to crochet a poncho
1. Design the initial pattern
To make a crochet poncho, it's essential to start with the base. And what is the base of this work? The two rectangles of the same size that we will have to knit to later join them.
This basic design is ideal for beginners because it doesn't require complex shapes. And, furthermore, it allows you to wear it in different ways. This will make your crochet poncho an ideal multi-position piece.
Several extra tips:
- For a medium size, we recommend that each rectangle measures approximately 80 x 50 cm. You can adjust the dimensions according to your needs.
- Alternate neutral tones with fluorescent color stripes, just as we have done with the crochet poncho shown in the images.
2. Create the rectangles using the staggered stitch
The staggered stitch, in addition to being easy to knit, adds dynamism to the design and allows you to combine colors and textures to achieve a visually attractive result.
How to knit the staggered stitch for your crochet poncho?
- It is a multiple of 8 + 4 stitches.
- The main stitches are chain, single crochet, and triple treble crochet.
- Color changes are always made by closing the last stitch with the new color.
However, if you prefer, you can use any other stitch, and combine fluorescent colors with neutral tones in the same way. This crochet project is valid for all types of crochet stitches.
You can extrapolate the idea to basic stitches, or stitches with reliefs and textures, and even with granny squares. The key is the construction of the crochet poncho to achieve a modern and fun result.
Extra tip: use stitch markers to keep the color sequence consistent. This will avoid errors and ensure a uniform fabric.
3. Assemble the rectangles to shape the poncho
With the rectangles already knitted, the next step is to assemble them to shape your crochet poncho. To do this, follow these steps:
- Identify each piece as A and B.
- To assemble the poncho, start by folding both pieces in half.
- Then, align the side of piece A with the end of piece B, making sure the edges match perfectly.
- Next, join the right side of piece B with the end of piece A in the same way. These joins will form the basic structure of the poncho, leaving a central opening for the head.
- Finally, check that the seams are well aligned and secured to ensure a good fit and finish for your poncho.
Use a tapestry needle to connect the edges with slip stitches. And for greater firmness, make a second pass with single crochet stitches over the seams or a decorative picot edge.
4. Add final details and finishes
The final details are what will make your crochet poncho truly special.
- Block the fabric: this step sets the shape and highlights the stitches of the design. Lightly dampen the garment, lay it flat, and let it dry completely.
- Personalization: add fringes for a bohemian style or finish the edges with contrasting colors using single crochet stitches.

How to style your poncho
The poncho is such a versatile garment that you can adapt it to different styles. Shall we give you some ideas?
- Classic style: wear it as a cape over t-shirts or dresses for a relaxed and casual look.
- Bohemian style: combine it with skinny jeans, leather boots, and fringes for a bohemian vibe.
- Modern style: make fluorescent tones the stars by using accessories in neutral tones.

Frequently asked questions about how to make a crochet poncho
How long does it take to make a poncho?
The time it takes to crochet a poncho varies depending on your experience, the complexity of the design, and the thickness of the yarn you choose. If you are a beginner and follow a simple pattern with basic stitches, you could complete it in approximately one to two weeks by crocheting a couple of hours a day. However, if you opt for a more elaborate design with color changes, textures, or more complex rounds, the time can extend up to several weeks. The key is to progress at your own pace and enjoy the creative process.
What types of yarn are best?
We recommend Rubí Clásica, as it is a soft, durable, and easy-to-work-with yarn, also available in a wide variety of colors.
How to choose colors?
Color choice is key to achieving a harmonious and attractive design. If you are looking for a versatile poncho that matches any look, opt for neutral tones like beige, gray, brown, or black as a base. For a more striking and modern effect, you can add stripes in vibrant colors such as mustard, burgundy, olive green, or petrol blue. Another option is to combine gradients or create a boho-inspired design with earthy colors and warm tones. In the end, it all depends on your personal style and how you want to use your garment.
Design your own poncho
Knowing how to make a crochet poncho will give you wings to continue exploring the world of crafts. With this guide, the right materials, and some dedication, you can create a garment that will be a source of pride.
What are you waiting for? Now that you know how to make a crochet poncho. Grab your hook and start knitting! And don't forget to follow us on Instagram to stay updated on all our news.


