

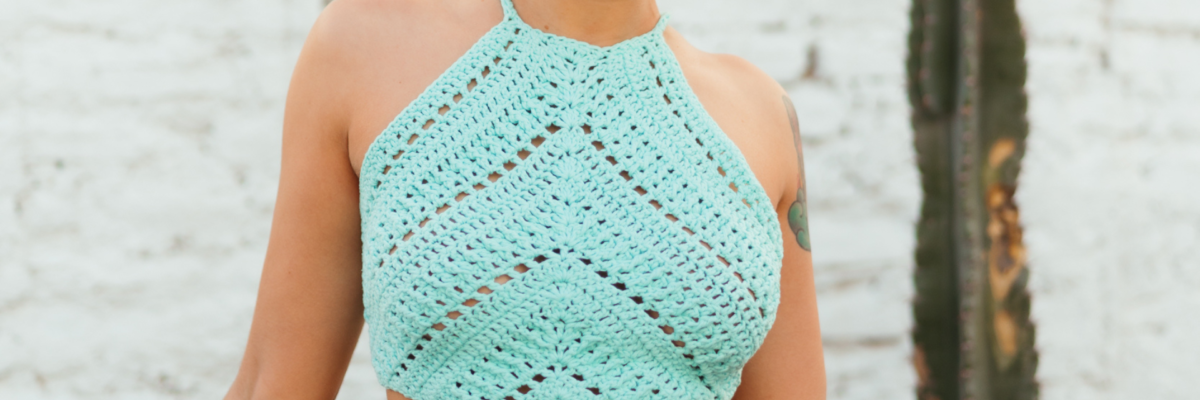
Top Candela
Exclusive design by Made in Rox. Click to discover the tutorial in its old version with Rubí Sunny on our YouTube Channel.
MATERIALS
Rubí Handy Cotton. 2 balls.
5mm crochet hook.
3 stitch markers
Yarn needle
Scissors
Choose your favorite colors in the online store.

PATTERN
Pattern indicated for size M or chest size 85. Please refer to the following approximate measurements:

Instructions are given throughout the pattern to modify it and adapt it to different sizes.
We can differentiate three key parts in this pattern.
The first consists of crocheting a triangle by working back and forth rows as indicated in the step-by-step pattern, taking into account the abbreviations of the stitches and the yarn used. The chart included in the pattern can also serve as a guide for this part.
The second part consists of transforming this triangle by increasing the number of rows on the sides of the initial piece to achieve the desired shape.
Finally, a third part consists of finishing the edges and creating the top's straps as indicated in the step-by-step.
STITCH ABBREVIATIONS:
Ch = chain stitch
Sl st = slip stitch
Dc = double crochet
Hdc = half double crochet
Sc = single crochet
FPdc = front post double crochet
BPdc = back post double crochet
STEP-BY-STEP:
We work with Rubi Sunny color 107 and a 5mm crochet hook.
BODY
Start by making 3 Ch and 1 Sl st into the first stitch to form a circle on which we will begin to crochet the rows (a magic ring can also be used).
Row 1: 3 Ch (counts as the first Dc of the row), 6 Dc into the initial circle. Place stitch markers in the first stitch (the third chain), the central Dc, and the last Dc. (7 stitches in total)
From here, after each crocheted row, reposition the stitch markers in the first stitch (always the third chain), the central stitch, and the last stitch.
Row 2: 3 Ch (first Dc), 1 Dc in the same stitch, Dc until reaching the central marker, 5 Dc together in the central stitch, Dc until reaching the last marker, 2 Dc together in the last stitch. (13 stitches in total)
Row 3: 3 Ch (first Dc), 1 Dc in the same stitch, [1 Ch, skip one stitch, 1 Dc] repeat until 1 stitch remains before reaching the central stitch, 1 Ch, [1Dc, 1Ch, 1Dc, 1Ch, 1Dc] in the central stitch, [1 Ch, skip one stitch, 1 Dc] repeat until 1 stitch remains before reaching the last stitch, 1 Ch, 2 Dc together in the last stitch. (19 stitches in total)
Row 4: repeat row 2 (25 stitches in total)
Row 5: 3 Ch (first Dc), 1 Dc in the same stitch, [1 FPdc, 1 Dc] repeat until one stitch remains before reaching the central stitch, 1 FPdc, 5 Dc together in the central stitch, [1 FPdc, 1 Dc] repeat until 1 stitch remains before reaching the last stitch, 1 FPdc, 2 Dc together in the last stitch. (31 stitches in total)
Row 6: 3 Ch (first Dc), 1 Dc in the same stitch, [1 Dc, 1 BPdc] repeat until reaching the central stitch, 5 Dc together in the central stitch, [1 BPdc, 1 Dc] repeat until reaching the last stitch, 2 Dc together in the last stitch. (37 stitches in total)
In this way we have constructed: two rows of double crochet, one row with openwork, one row of double crochet, two rows of relief stitches; a total of 6 rows which are shown in the following chart.

We must repeat these rows two more complete times until row 18 is finished.
In this row we will have 109 stitches in total.
SIDES
Without cutting the yarn from the part crocheted so far, we will work on the side where we left off, making rows that will end before reaching the central stitch of the piece as follows:
Row 19: 3 Ch (first Dc), 1 Dc in the same stitch, 49 Dc, 1 Hdc, 1 Sc. To make sure you do it correctly, you can verify that the Hdc is crocheted on the last stitch of the side before reaching the 5 central stitches).
Row 20: Skip the Sc, 1 Sc on the Hdc, 1 Hdc, Dc until reaching the last stitch (49 in total), 2 Dc together on the last stitch.
Row 21: 3 Ch (first Dc), 1 Dc in the same stitch, [1 Ch, skip one stitch, 1 Dc] repeat 24 times, 1 Ch, skip one stitch, 1 Sc. You can verify that the Sc and Hdc from the previous row remain unworked.
Row 22: Skip the Sc, 1 Sc, 1 Hdc, Dc until reaching the last stitch (48 in total), 2 Dc together on the last stitch.
Repeat these rows in the same way on the other side of the top.
EDGES AND STRAPS
In this third part of the top to work, you must follow the next steps continuing with the yarn left after working the second side of the top:
- Work the bottom part of the top with single crochet stitches.
- When you reach the bottom left corner, make 1Sc, 4 Ch, 1Sc in that stitch to create an eyelet through which the strap will pass.
- Continue crocheting single crochet stitches along the right side, so that when you have crocheted 20 Sc, make a chain stitch and skip a stitch before continuing with the single crochet stitches to create another eyelet.
- When you reach the top right corner, make 1 Sc, 225 Ch, turn back on these chain stitches with Sc until you reach the corner again and make 1 Sc on it again. This will create one of the top's straps.
- Continue crocheting single crochet stitches along the top part of the top until you reach the top left corner where you should work as in the previous step to create the other strap.
- Continue crocheting single crochet stitches along the left side, so that when 20 Sc remain to be crocheted, make a chain stitch and skip a stitch before continuing with the single crochet stitches to create an eyelet.
- When you reach the bottom left corner, make 1Sc, 4Ch, 1Sc to create the last eyelet and finish with 1 Sl st to close this round.
Now all that's left is to hide the ends with a yarn needle, cut the excess, and place the straps by crossing them at the back and inserting them through the eyelets created 20 stitches from the bottom, and then crossing them again and inserting them through the eyelets at the bottom corners.
SIZE ADAPTATIONS:
If you want to adapt the pattern to make larger or smaller sizes, consider the following indications:
*To achieve a longer/shorter top, you can make more/fewer repetitions in the rows of the top's body. Instead of working up to row 18, you can make more repetitions until you achieve the desired top length. If you make this modification, you should keep in mind that the width of the top will also be increased/decreased.
*To achieve a wider/narrower top, you can make more/fewer rows on the sides of the top (following the pattern of 2 rows of Dc, 1 row with openwork, 1 row of Dc and 2 rows of relief stitches) until you achieve the desired width. For this, you should keep in mind:
*In the rows that go from bottom to top, you should end with 1 Hdc and 1 Sc so that the Sc and Hdc of the previous row remain unworked.
*In the rows that go from top to bottom, you should keep in mind that they start by skipping the Sc, then 1 Sc is made, and then the row continues, ending with 2 Dc together in the last stitch.
*To achieve a longer/shorter top without modifying the width of the top at all, you can make back and forth rows on the bottom part of the top (following the pattern of 2 rows of Dc, 1 row with openwork, 1 row of Dc and 2 rows of relief stitches) until you achieve the desired length.
FINAL RESULT


