

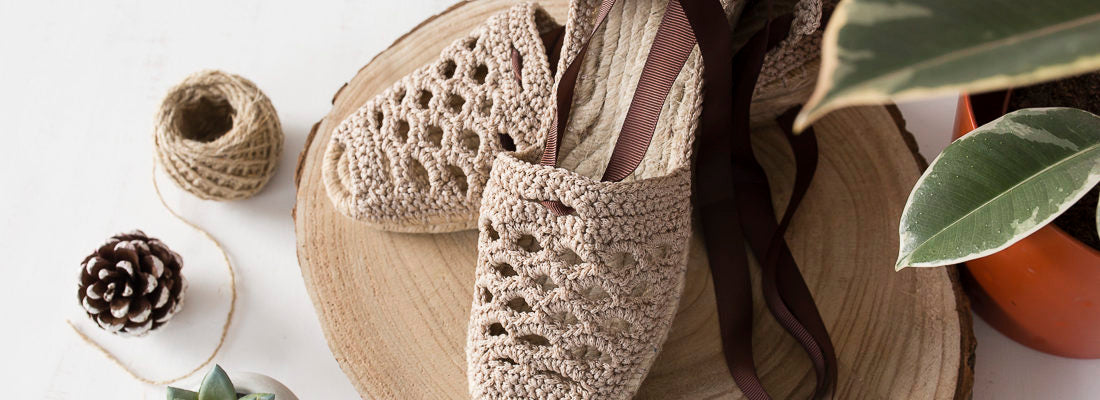
Macramé espadrilles are the new must-have for spring. Unlike classic models with fabric toes and raffia soles, this macramé espadrille model, an exclusive design from Knitting Sheep, goes further, giving it a avant-garde touch.
If you've fallen in love with them too, we're giving you the pattern for the Rubí Macramé sandals. Choose your favorite color and get to work to knit the sandals of the season.
MATERIALS
- 1 ball of Rubí Macramé yarn.
- 1 pair of espadrille soles with a 5cm wedge.
- 1 tapestry needle with a point.
- 1 3.50 mm crochet hook.
- Ottoman ribbon in the desired color.
- Scissors and measuring tape.
Find your colors in our online store.
SIZE: 37
LEVEL: Intermediate.
REVERSIBLE STITCH: NO.
ABBREVIATIONS Ch = Chain Sl st = Slip stitch Sc = Single crochet Dec = Decrease Repeat sequence = St(s). = Stitch(es).
CHECK THE SIZE CHART HERE


INSTRUCTIONS
Sole Preparation:
1. With the help of a pin and a measuring tape, mark the tip of the espadrille sole. This mark will serve as a guide to define the toe. Next, measure 2.5 cm to the left and place a pin (A). Repeat the same to the right (B). Thread the macramé yarn onto a tapestry needle and make a blanket stitch from pin B to B, going all around the sole. In total, there should be 50 stitches. 2. With a crochet hook, work 2 Sc in each blanket stitch. Start at the tip and go all the way around. Ch. (100) 3. Work 1 Sc in each stitch of the previous row. Ch. (100)
Sandal Instep:
- Chain 6 and join to the sole with 1 Sc, 1 Sc, Ch. (6) Note: The first 4 rows in Sc will always be joined to the sole with 1 Sc, 1 Sc, Ch. 2. Work 7 Sc, wrapping around the 6 chains from the previous row. Join to the side with 1 Sc, 1 Sc, Ch. (7) 3-4. Work 7 Sc. Join with 1 Sc, 1 Sc, Ch. (7) 5. Ch 4, skip 3 stitches, 1 Sc, Ch 4 and join with 1 Sc, 1 Sc, 1 Sc. Ch. (2 arches) Note: From now on, the instep will be joined to the sole with 1 Sc, 1 Sc, 1 Sc. 6. Inside the arch work *5 Sc*. Repeat 1 more time. Join with 1 Sc, 1 Sc, 1 Sc. (2 arches) 7. *Ch 4, 1 Sc (work it in the third stitch of the previous arch). Repeat 1 more time. Ch 4. Join with 1 Sc, 1 Sc, 1 Sc. Ch. (3 arches) 8. Work *5 Sc* in each arch. Join with 1 Sc, 1 Sc, 1 Sc. (3 arches) 9. *Ch 4, 1 Sc (work it in the third stitch of the previous arch). Repeat 2 times. Ch 4. Join with 1 Sc, 1 Sc, 1 Sc. Ch. (4 arches) 10. Work *5 Sc* in each arch. Join with 1 Sc, 1 Sc, 1 Sc. (4 arches) 11. *Ch 4, 1 Sc (work it in the third stitch of the previous arch). Repeat 3 times. Ch 4. Join with 1 Sc, 1 Sc, 1 Sc. Ch. (5 arches) 12. Work *5 Sc* in each arch. Join with 1 Sc, 1 Sc, 1 Sc. (5 arches) 13. *Ch 4, 1 Sc (work it in the third stitch of the previous arch). Repeat 4 times. Ch 4. Join with 1 Sc, 1 Sc, 1 Sc. Ch. (6 arches) 14. Work *5 Sc* in each arch. Join with 1 Sc, 1 Sc. Ch. (6 arches) 15. 24 Sc. Join with 1 Sc, 1 Sc, Ch. (24) 16. In this row, eyelets for the ribbon will be made: 8 Sc, Ch 3, skip 3 stitches, 2 Sc, Ch 3, skip 3 stitches, 8 Sc. Join with 1 Sc, 1 Sc, Ch. (24) 17. 24 Sc. Join with 1 Sc, 1 Sc, Ch. 18. 24 Sc. Join with 1 Sc, 1 Sl st.

Heel:
- Once the instep is finished, count 12 stitches and tie off the yarn. Make 1 Ch. and 1 Sc in the same stitch and work the next 28 Sc. Ch. (29) See image under SOLE PREPARATION. 2. 1 Sc in each stitch of the previous row. Ch. (29) 3. Dec, 25 Sc, Dec. Ch. (27) 4. 27 Sc. Ch. (27) 5. Dec, 23 Sc, Dec. Ch. (25) 6. 25 Sc. Ch. (25) 7. Dec, 21 Sc, Dec. Ch. (23) 8. 1 Sc, 2 Ch, skip 2 stitches, 17 Sc, 2 Ch, skip 2 stitches, 1 Sc. Ch. (23) 9. 1 Sc, Dec (1 Sc in the eyelet), 17 Sc, Dec (1 Sc in the eyelet), 1 Sc, Ch. (21) 10. 21 Sc. Ch. (21) 11. 21 Sc. Sl st. (21)

Straps:
For the straps, you can buy Ottoman ribbon in different colors and change them to match your outfit. Another option is to crochet the straps with Macramé yarn. Chain 224 and make a Sl st in each stitch of the previous row. In both cases, burn the ends of the ribbons with a lighter to prevent fraying.
Finishing:
Weave in all loose ends, using them to reinforce the attachment to the sole.
FINAL RESULT


