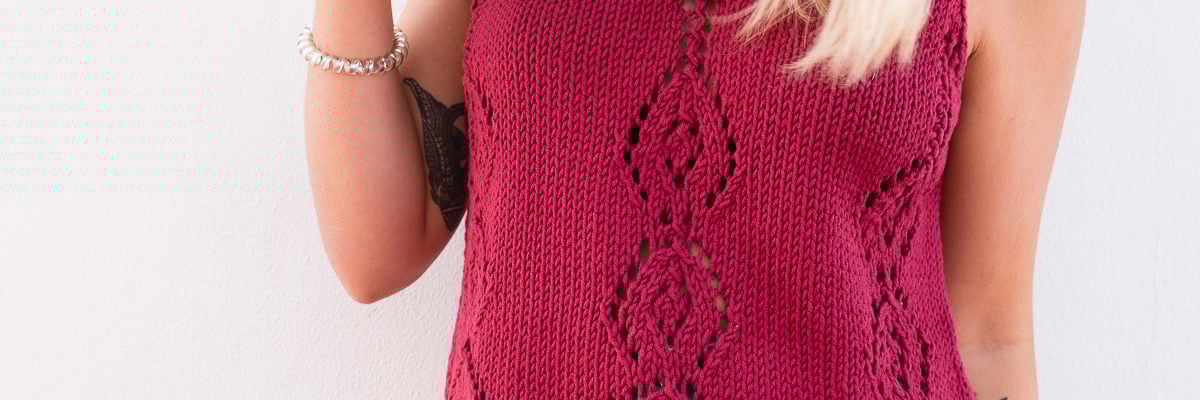
Spring has arrived, and we're ready to show off and mix and match the freshest garments and the most sought-after trends. Pearl Knitter has designed this openwork top with small diamonds that is perfect to wear with your favorite jeans. Do you dare? Make it in your favorite color!
MATERIALS:
6 skeins Natural Medium Rubí 50 gr 75 m approx.
Needles size 5.5
Diamond Lace Stitch, Knit Stitch, Stockinette Stitch
Find your favorite colors in our online store.
FINAL RESULT:


PATTERN:
There are 2 identical pieces (front and back). Strappy top with oval neckline and armholes. It has 3 central diamond-shaped motifs in 2 sizes (the first 3 are larger, the next 2 are smaller).
Size: The step-by-step instructions correspond to an approx. M size. It is possible to maintain the design and adapt it to more or less width, or more or less length (observe the final measurements, the tension swatch, and consult the explanation of adapting to your size to know how to adapt it to you).
Final Measurements: (Width 54 cm) (Length 62 cm)
Tension swatch: 16 stitches 10cm /20 rows 10 cm
TO TAKE INTO ACCOUNT:
Each large lace diamond motif consists of 21 stitches. The edge stitches (2KN) and those between the motifs (3KN) are what allow us to adapt the size without changing the design. This means that if you need more width, you will have to include more stitches between the motifs or at the edges, or if you need less width, remove them.
We have the 3 largest diamond motifs, followed by 6 smaller diamonds in height, in 2 wide stripes. If, for example, you needed your top to be shorter, you would have to eliminate 1 of these repetitions, therefore 1 pattern. Conversely, if you want more length, you would add another one. The repetition to eliminate or add is the intermediate one, as the third lace pattern is where we will make the necessary steps to create the armhole and neckline while knitting the diamond lace pattern.
The 2 initial garter stitch border rows are not counted in the overall calculation of the top (if you wanted your top longer, you could also add some rows to the garter stitch border, instead of repeating the 16 rows of the small diamond, your choice will depend on what you want to achieve).
Even rows are always purled. Always taking into account the selvage stitch (the first stitch is slipped knitwise, the last stitch is knitwise).
If the first 3 diamonds have 21 stitches, these are the calculations for casting on the stitches: 21*3= 63, +4 edge stitches + 6 stitches between the motifs = 73 stitches.
ABBREVIATIONS
SS: Selvage Stitch (slip the first stitch knitwise, knit the last stitch knitwise, on both odd and even rows)
KN: Knit Stitch
PR: Purl Stitch.
K2tog: knit 2 stitches together.
P2tog: Purl 2 stitches together
P2tog TBL: Purl 2 stitches together through the back loop.
YO: Yarn Over.
SKP: Slip 1 knitwise, knit 1, pass slipped stitch over knitted stitch.
SD: S2KP (slip 1 knitwise, knit 2 together, pass slipped stitch over knitted stitches).
R: Row
*_*: repeat steps between asterisks.
= repeat indicated steps (can be equal to a row, or in the case of the strap step-by-step table, the same steps from the left column are repeated).
STEP BY STEP:
STEP 1: cast on stitches, border, and start of diamond pattern.
We will indicate the step-by-step for each odd row, even rows will always be purled (remember to do SS on all of them) with the exception of R40, R42, and R56 which are different, purled and specified in the step-by-step with their peculiarities.
• Cast on 73 sts.
• Knit 2R (these rows do not count in the overall total, they are the border)
First diamond pattern (3 large diamonds)
R1: 1SS/1KN/*8KN/K2tog/1YO/1KN/1YO/1SKP/8KN*/3KN/*_*/3KN/*_*/2KN
R3: 1SS/1KN/*7KN/K2tog/1YO/3KN/1YO/1SKP/7KN*/3KN/*_*/3KN/*_*/2KN<
R5: 1SS/1KN/*8KN/1YO/1KN/1SD/1KN/1YO/8KN*/3KN/*_*/3KN/*_*/2KN
R7:1SS/1KN/*6KN/K2tog/1YO/5KN/1YO/1SKP/6KN*/3KN/*_*/3KN/*_*/2KN
R9:1SS/1KN/*7KN/1YO/2KN/1SD/2KN/1YO/7KN*/3KN/*_*/3KN/*_*/2KN
R11: 1SS/1KN/*5KN/K2tog/1YO/7KN/1YO/1SKP/5KN*/3KN/*_*/3KN/*_*/2KN
R13: 1SS/1KN/*4KN/K2tog/1YO/9KN/1YO/1SKP/4KN*/3KN/*_*/3KN/*_*/2KN
R15: 1SS/1KN/*3KN/K2tog/1YO/5KN/1YO/1SKP/4KN/1YO/1SKP/3KN*/3KN/*_*/3KN/*_*/2KN
R17: 1SS/1KN/*2KN/K2tog/1YO/4KN/K2tog/1YO/1KN/1YO/1SKP/4KN/1YO/1SKP/2KN*/3KN/*_*/3KN/*_*/2KN
R19: 1SS/1KN/*1KN/K2tog/1YO/4KN/K2tog/1YO/3KN/1YO/1SKP/4KN/1YO/1SKP/1KN*/3KN/*_*/3KN/*_*/2KN
R21: 1SS/1KN/*K2tog/1YO/4KN/K2tog/1YO/2KN/1YO/1SKP/1KN/1YO/1SKP/4KN/1YO/1SKP*/ 3KN/*_*/3KN/*_*/2KN
R23 and R25 = R21
R27: 1SS/1KN/*K2tog/1YO/4KN/K2tog/1YO/K2tog/1YO/1KN/1YO/1SKP/1YO/1SKP/4KN/1YO/1SKP*/3KN/*_*/3KN/*_*/2KN
R29 = R21
R31: 1SS/1KN/*2KN/1YO/1SKP/4KN/1YO/1SKP/1KN/K2tog/1YO/4KN/K2tog/1YO/2KN*/3KN/*_*/3KN/*_*/2KN
R33: 1SS/1KN/*1KN/1SKP/1YO/6KN/1YO/1SD/1YO/6KN/1YO/K2tog/1KN*/3KN/*_*/3KN/*_*/2KN
R35: 1SS/1KN/*3KN/1YO/1SKP/5KN/1YO/K2tog/4KN/K2tog/1YO/3KN*/3KN/*_*/3KN/*_*/2KN
R37: 1SS/1KN/*4KN/1YO/1SKP/9KN/K2tog/1YO/4KN*/3KN/*_*/3KN/*_*/2KN
R39: 1SS/1KN/*5KN/1YO/1SKP/7KN/K2tog/1YO/5KN*/3KN/*_*/3KN/*_*/2KN
Next, you have the step-by-step for the following rows:
R40: 1SS/1PR/*6PR/1YO/P2tog/5P/P2tog TBL/1YO/6PR*/3PR*_*/3PR/*_*/1PR/1KN
R41: 1SS/1KN/*7KN/1YO/1SKP/3KN/K2tog/1YO/7KN*/3KN/*_*/3KN/*_*/2KN
R42: 1SS/1PR/*8PR/1YO/P2tog/1PR/P2tog TBL/1YO/8PR*/3PR*_*/3PR/*_*/1PR/1KN
R43: 1SS/1KN/*9KN/1YO/1SD/1YO/9KN*/3KN/*_*/3KN/*_*/2KN
Knit R44 in PR as we have been doing so far, you have completed the large diamond lace pattern.
STEP 2 – INTERMEDIATE DIAMONDS
— Space for length adjustment if necessary.
From R45 to R60 are the 16 rows with which we will create the intermediate diamond pattern.
Purl rows are worked as usual, unless otherwise indicated (R56).
If you wanted to adjust the length of your sweater, because you wanted it shorter, this would be the group of rows you would have to eliminate. It would also be the group of rows that you would have to repeat if you wanted a longer top.
Follow these steps:
R45: 1SS/1KN/*6KN/K2tog/1YO/5KN/1YO/1SKP/6KN*/3KN/*_*/3KN/*_*/2KN
R47: 1SS/1KN/*5KN/K2tog/1YO/3KN/1YO/1SKP/2KN/1YO/1SKP/5KN*/3KN/*_*/3KN/*_*/2KN
R49: 1SS/1KN/*4KN/K2tog/1YO/2KN/K2tog/1YO/1KN/1YO/1SKP/2KN/1YO/1SKP/4KN*/3KN/*_*/3KN/*_*/2KN
R51: 1SS/1KN/*4KN/1SKP/1YO/1KN/1SKP/1YO/3KN/1YO/K2tog/1KN/1YO/K2tog/4KN*/3KN/*_*/3KN/*_*/2KN
R53: 1SS/1KN/*6KN/1YO/1KN/1SKP/1YO/1SD/1YO/K2tog/1KN/1YO/6KN*/3KN/*_*/3KN/*_*/2KN
R55: 1SS/1KN/*7KN/1YO/2KN/1SD/2KN/1YO/7KN*/3KN/*_*/3KN/*_*/2KN
R56: 1SS/1PR/*8PR/1YO/P2tog/1PR/P2tog TBL/1YO/8PR */3PR*_*/3PR/*_*/1PR/1KN
R57 = R43
R59 = R43
R60: in PR (except selvage stitches)
STEP 3 – THIRD DIAMOND PATTERN + ARMHOLE + CENTRAL NECKLINE
R61 = R45 // R63 = R47 // R65 = R49 // R67 = R51 // R69 = R53
R70: 1SS/2KN/67PR/3KN (Rows R72 and R74 are knitted the same as R70)
R71: 1SS/ 1KN/*7KN/1YO/2KN/1SD/2KN/1YO/7KN*/3KN/**/3KN/**/2KN
R73: 1SS/ 1KN/*8KN/1YO/1SKP/1KN/K2tog/1YO/8KN*/3KN/**/3KN/**/2KN
R75: 1SS/ 1KN /*9KN/1YO/1SD/1YO/9KN*/3KN/**/3KN/**/2KN
R76: 1SS/ 2KN/67PR/3KN
R77: 1SS/10KN/1YO/1SD/1YO/21KN/1YO/1SD/1YO/21KN/1YO/1SD/1YO/11KN
R78: 1SS/3KN/65PR/4KN
R79: Same as row 77
R80: 1SS/3KN/65PR/4KN
R81: Bind off 3KN/8KN (counting the one on the needle) / 1YO/1SD/1YO/21KN/1YO/1SD/1YO/21KN/1YO/1SD/1YO/11KN—70 stitches
R82: Bind off 3KN/3KN/28PR/5KN/28PR/3KN —67 stitches
R83: 1SS/2KN/1SKP/3KN/1YO/1SD/1YO/45KN/1YO/1SD/1YO/3KN/K2tog/3KN –65 stitches
R84: 1SS/2KN/26PR/7KN/26PR/3KN
R85: 1SS/2KN/1SKP/2KN/1YO/1SD/1YO/45KN/1YO/1SD/1YO/2KN/K2tog/3KN –63 stitches
R86: 1SS/2KN/24PR/9KN/24PR/3KN
On R87 neckline and separation
R87: 1SS/2KN/1SKP/1KN/1YO/1SD/1YO/21KN—Bind off 3KN for the neckline/ 21KN/1YO/1SD/1YO/1KN/K2tog/3KN—
We have 29 stitches for each strap
STEP 4 – STRAPS
From now on we will knit the straps, ideally knitting both at the same time so it doesn't get so heavy. You can do it with 1 same skein, using the end of the yarn and the yarn you are knitting with, respectively on each strap, or use 1 new skein and knit with 2 skeins at a time. Some rows start and end the same, others don't, the step-by-step for each is indicated in the table with the same row number.

On R114 we have finished the neckline decreases. We will continue knitting following the steps of R115 and R116 until R128, with 9 sts on each strap.
Bind off stitches on R129
Repeat the same steps to knit the second piece.


