

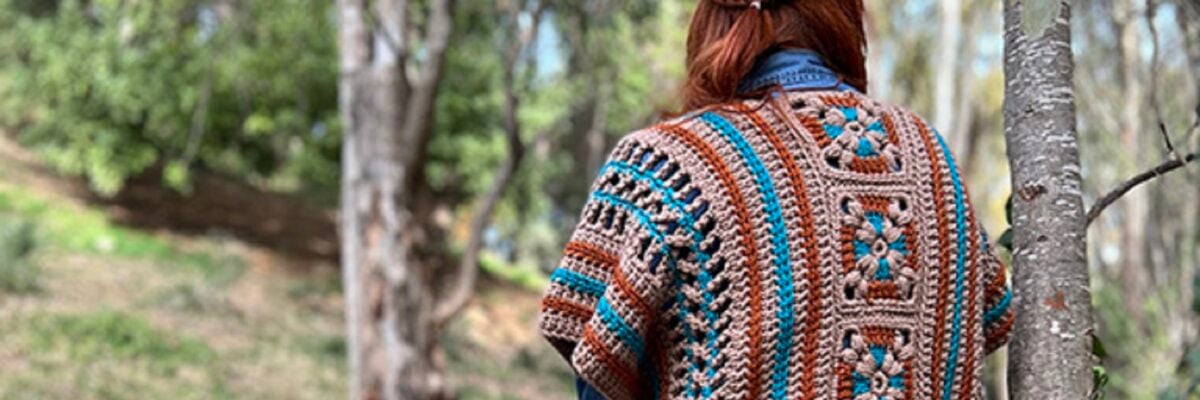
Granny square poncho
To add warmth to your outfits in a fun and casual way, the Granny Poncho has arrived at our blog, a new project from our Knitter Pro Own Style DIY.
Full of color, on-trend, and with that boho-chic touch we love, it will be perfect for a 180º turn to your most basic outfits. Let's get started!
MATERIALS
4 balls of Rubí Sport col. 890
2 balls of Rubí Sport col. 880 and Rubí Sport col. 073
5 mm hook or larger if you crochet very tightly.
Tapestry needle, scissors, and stitch markers if needed.

HOW TO CROCHET THE PATTERN?
BEFORE YOU START
This poncho is made up of two side pieces that run from the front to the back, and central grannies that join these two pieces, both at the front and at the back.
We will join it at the sides directly with fringe.
The bottom part will have several rows in relief stitch to create a ribbed edge.
We will start by making the grannies, followed by the sides, we will join them in the center, make the ribbed edge, and finish by adding the fringe.
ABBREVIATIONS

PATTERN
GRANNIES

You should make 8 identical grannies, 4 for the front and 4 for the back.
Round 1. This granny begins with a magic ring in brown and 8 sc inside. Close
with a sl st in the first stitch and change to blue.
Round 2. Carry the brown yarn along. In blue, make 3 ch, 2 dc in the
same stitch. Change to brown, make 1 hdc, 3 ch, 1 hdc in the same stitch. Change to blue, make 3 dc in the same stitch, change to brown and make 1 hdc, 3 ch, 1 hdc in the same stitch, repeat 3 times. Close with a sl st in the starting ch, changing to terracotta.
Round 3. In terracotta, make 3 ch, 3 dc and change to brown. Make 1 hdc, 3 ch, 1 hdc in the same corner space.
Change to terracotta, continue with 5 dc, change to brown and make 1 hdc, 3 ch, 1 hdc in the corner space repeat
3 times. Close with a sl st in brown.
Round 4. 1 ch, start with sc from the starting ch of the previous round, you should make 5 sc before reaching the corner, in the corner make 3 sc, 2 ch, 3 sc.
Continue with 7 sc and in the corner make 3 sc, 2 ch, 3 sc, repeat 3 times. Close with a sl st in the first stitch.
You should block the grannies, you can do it separately, once the 4 are joined in a row or with the finished poncho. I recommend doing it separately or once the row of 4 grannies is joined.
Now you must join the grannies to each other, forming two rows of 4 grannies. Do this by facing the right side of one granny and the right side of another, and on the wrong side, make sl sts, taking only the back loop of the stitch.
Leave these two rows of 4 grannies aside, awaiting the sides.
SIDES

To make the two sides, you must repeat these 19 rows twice, separately. In each row, you will cut the yarn to avoid wasting it.
Start with 119 ch.
Round 1. 3 ch, 119 dc. Change color on the last yarn over of the stitch.
Round 2. 2 ch, 119 hdc, the last one in the starting ch of the previous round. Change color on the last yarn over.
Round 3. 3 ch, 119 dc (t). Change color on the last yarn over.
Round 4. 2 ch, 119 hdc. Change color on the last yarn over.
Round 5. 3 ch, 119 dc (t). Change color on the last yarn over.
Round 6. 2 ch, 119 hdc. Change color on the last yarn over.
Round 7. 3 ch, 119 dc (t). Change color on the last yarn over.
Round 8. 4 ch, 1 ch for separation, skip the first stitch and make 1 tr, continue with 1 ch, skip a stitch and make 1 tr, until the end. The last tr in the starting ch. Change color on the last yarn over.
Round 9. 1 ch, from the second stitch make sc until the end, including the starting ch. Change color on the last yarn over.
Round 10. 4 ch, skip 4 stitches, in the 4th make 1 tr, 1 ch for separation and go back, passing behind the tr you made, to make 1 tr in the second stitch.
Skip two stitches and in the 3rd make 1 tr, 1 ch for separation, go back two stitches to make a tr in that 2nd
stitch backwards. Continue with this last sequence until the end. Change color on the last yarn over.
Round 11. 1 ch, from the second stitch make sc in all stitches and separation spaces. In the spaces, crochet around the
ch, do not make the stitch inside the ch.
Round 12 – 19. You will repeat from round 8 to 1, doing the same as at the beginning, but in reverse.
Once both sides are made, you must join them with sl sts on the wrong side with the granny rows. Take one of the rows and, facing the right side of one of the sides and the right side of the granny row, you will join it with sl sts through the back loop. You must also do this on the other side of the row and the other side piece, both on the front and on the back.
SIDE JOINT
To join the sides of the poncho, you will do so directly with the fringe. Cut brown yarn strands about 38/40 cm long. You will take one side and the other of the side and, with the yarn, make a macramé lark's head knot. It is one of the most basic and simple.
Fold the strand in half, use the needle to pass it through both parts of the sides, insert the two strands that are on the other side through the loop you created, pull the strands to tighten the knot, and that's it.
You have to do this along the entire side, leaving the opening you want for the arms. I have used 32 fringes.
WAIST FINISH
We are going to give more uniformity to the waist by making a few rows of front post double crochet and back post double crochet.
First, you must make a whole round of dc. Start from one of the sides. Then continue making rows of front post double crochet and back post double crochet.
Make as many rows as you want and as much yarn as you have. I made 3, counting the first double crochet row.
BLOCKING THE GARMENT
If you didn't block the grannies, it might be a bit flared at the back, so you could block it now.
Especially to stretch the granny part, the width wouldn't need to be stretched as much.
Dampen the garment; I recommend doing it by hand with some hand-washing soap. You could remove the excess water in the washing machine's spin cycle or with a dry towel, by rolling the garment in the towel itself.
Then place it on a surface where you can pin it to stretch the parts you need using blocking pins or pins. Let it dry horizontally, and it will take the desired shape.
FINAL RESULT


