

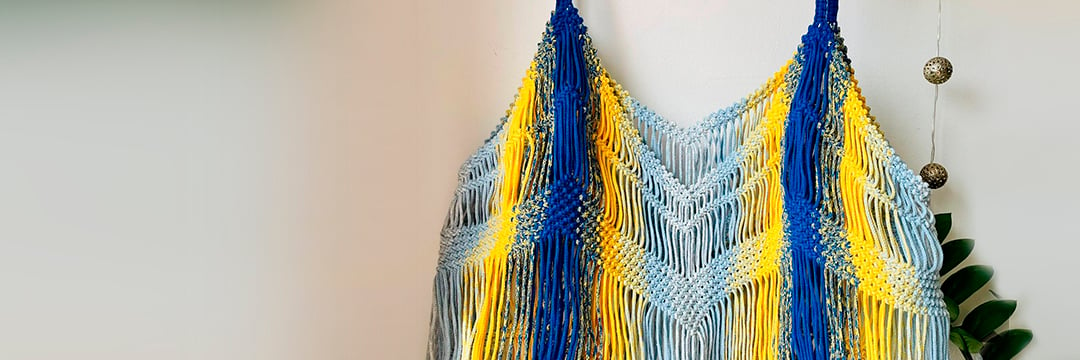
Summer Top
and the combination. Wearing cheerful tones is a must to match the most summery plans, and that's why we bring you a new pattern that fits perfectly. It's called Summer Top, designed by Beatrice’s Shop and knitted with Rubí Imagina, a braided skein made up of 7 independent mini balls that you can combine as you like.
MATERIALS
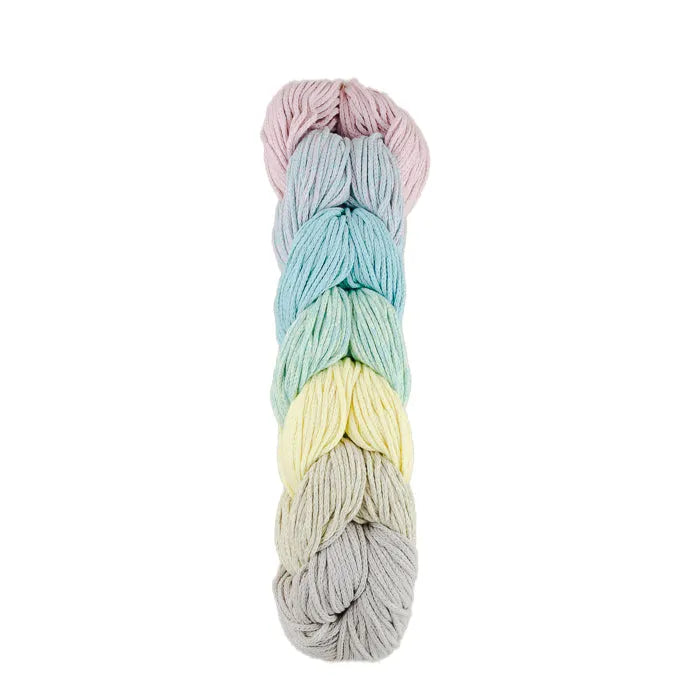
364 meters of Rubí Imagina yarn (2 balls). Color reference used VHA30.
Necessary accessories: Hanger, scissors and measuring tape. Masking tape to attach to the hanger.

INFORMATION
Measurements: Approximately 60x60 cm. Chest 90/100.
Knots used: square knot. Abbreviation in the pattern SK (square knot).
Material used: 364 meters of Rubi imagina yarn. Color reference used VHA30.
Necessary accessories: Hanger, scissors and measuring tape. Masking tape to attach to the hanger.
MODIFICATIONS
If you need to adjust the size, these are the measurements for it.
8 knotted threads correspond to 5 cm in the top, 16 meters of yarn.
KNOTS USED
The square knot is a fixed knot, made with 2 cords over a central support of 1 or more cords. In this case for 4 cords. Cords 1 and 4 are the ends, and cords 2 and 3 are the central ones.
Pass cord 1 over cords 2 and 3, then under cord 4. Take cord 4 and pass it under cords 2 and 3, pulling it through cord 1.
Tighten the knot.
Throughout the pattern, you will only use the square knot; do not tighten it too much so that the top remains loose and with movement.
HOW TO KNIT THE PATTERN?
START WITH THE STRAPS
Step 1: Prepare the hanger that will serve as a mannequin throughout the making. If it doesn't have support, you will need masking tape to hold the top during the process. Keep the measuring tape handy.

Step 2: Separate the 8 threads for the two straps. Fold to find the center and secure it or glue it with masking tape to the hanger. It should be well centered.
Step 3: Start with the front part, on the right strap. Make 10 SKs, leave a 6 cm gap, and continue with another 10 SKs.

Step 4: Continue on the right strap, now on the back. Following the knot in the central part, make 10 SKs, leave the 6 cm gap, and continue with 10 SKs.
Step 5: Once the right strap is finished, repeat the same process for the left strap. Start from the front so that the knots follow the same design.
RECOMMENDATION
Before starting, divide and organize the threads by color, making it clear where each one will go on the top. This will make it easier to add them equally to each part.

Divide the threads into four parts to distribute the colors. Two front parts, each consisting of 44 threads, and two back parts of 40 threads each.
The thread count by color in each piece is as follows:
Front: 4 blue, 8 blue-yellow, 8 yellow, 8 yellow-light blue, 8 light blue, and 8 light blue-white.
Back: 8 blue-yellow, 8 yellow, 8 yellow-light blue, 8 light blue, and 8 light blue-white.
CONTINUE WITH THE BODY
To make the body, keep in mind that you don't need a guide thread for knotting, as in this top, you will be adding threads by knotting to the previous knot, thus forming the triangular shape.
To facilitate the making of the top, divide it into four parts (one part at each end of the strap).
Always make the knots in rounds to maintain order and avoid mistakes.
Step 1: Start with the right strap, on the front. It doesn't matter which side you start the piece on. Begin by adding the first blue thread, folded in the middle, and make 1 SK with the two strap threads closest to the thread you are adding. The knot should be lower than the previous one.

Step 2: Continue on the same side, add the 2nd blue thread, fold in the middle and make 1 SK again with the two threads next to it, in this case blue. The new knot should always be lower than the previous one.
Step 3: Repeat the same process with the remaining threads of this part of the top. The order would be: 4 blue-yellow threads, 4 yellow threads, 4 yellow-light blue threads, 4 light blue threads and 4 light blue-white threads.
Step 4: Finish the first part of the top by adding the remaining threads to the other side of the strap. Always add the threads with 1 SK. Follow the same color order: 2 blue threads, 4 blue-yellow threads, 4 yellow threads, 4 yellow-light blue threads, 4 light blue threads and 4 light blue-white threads.

Step 5: Repeat the same process with the three remaining parts of the top. First the front left, and then continue with the back, first right and then left.
Always remember to do the same process. With the thread you add, make 1 SK with the two closest threads. The new knot should be lower than the previous one.
Step 6: Once you have completed all four parts, join them in the center of each with 1 SK.
It will be easier to join everything if you do it on the hanger.
You now have the shape of the top. Now you will make the body, following the same design in each round. Always using SKs, you will form different stripes. To form each piece, you always have to start from the highest point. You will need the measuring tape on several occasions.

Step 7: Start with the front right side. Select the four central threads, in this case blue. Make sure they are the correct ones, and make 1 SK with them.
Step 8: To complete the round, successively make 1 SK with two threads from the next knot and two threads from the previous one. Follow the shape of the top. Continue repeating the process until the first round is complete.
Step 9: Start the front left part. Select the four central threads, in this case blue. Repeat the same process as in the previous piece. When you reach the junction with the piece next to it, join it following the design with 1 SK. This completes the central peak.

Step 10: Continue with the back right side of the top. Repeat the same process as before, select the four central threads of the piece. Always check that they are the correct threads. Make 1 SK with them. Continue the round by repeating the previous process. Remember to knot with the piece next to it if it is already knotted, thus forming the peak shape.
Step 11: You are now on the last piece, back left. Repeat the same process as before. Select the four central threads, blue in color. And make 1 SK. Continue with the same process as in previous pieces until you reach the peak, where you join with the finished piece next to it, with 1 SK.
This is the knotting process you will perform throughout the project. Always starting from the highest point, and ending next to the join of the piece next to it.

Step 12: Go back to the front right side, and select the four central threads of the peak, which are blue. Using the measuring tape, measure from the highest point, and leave a gap of approximately 5 cm, then make 1 SK.
Step 13: To create the bust shape, you need to knot, gradually shortening the distance until you reach the center of the top with a separation of approximately 2 cm. Do the same for the other three parts. In this round, make only one strip of knots. Follow the same shape as in the previous round.
Step 14: Once the second round is finished. You will need the measuring tape again. Select the four central threads and this time leave a separation of approximately 6 cm. Make 1 SK with them.
Step 15: Repeat the same design as in the previous round. In this case, you will make five identical rounds, each one just below the previous one. Always check that you are using the correct threads.

Step 16: You're almost done. Use the measuring tape again, select the four central threads and leave a gap of approximately 10 cm. Make 1 SK with them.
Step 17: Repeat the same process as in previous rounds, but this time only make one round.

Step 18: Comb all the threads and mark the desired length for the fringes. Cut carefully and patiently.
For convenience, I recommend creating a template with the desired measurement, use it to cut each fringe.

FINAL RESULT


