


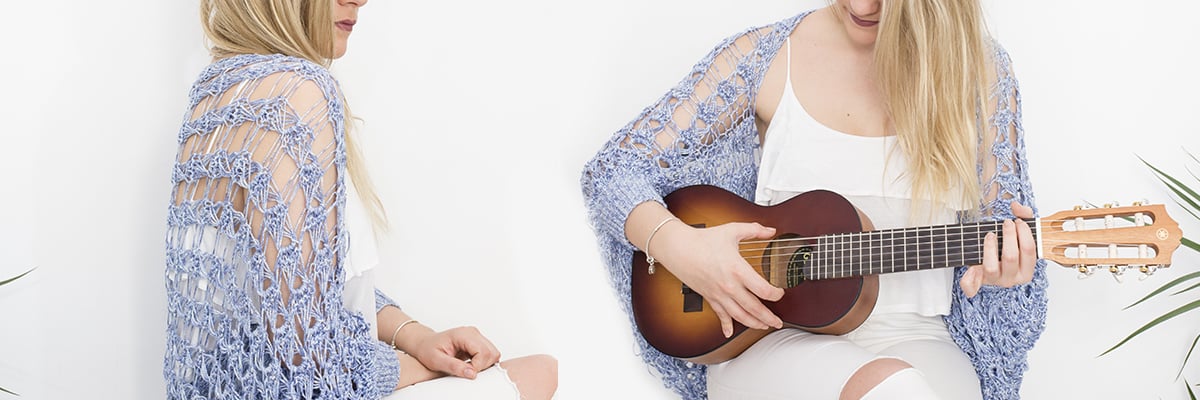
Blue Lake Top
Here's another perfect garment for spring! Dare to crochet the Lago Azul top by Gloriarte with the shade of Rubí Bambú Zen that you like the most.
MATERIALS
4 balls of Rubi Bambú Zen in color 104 (to crochet size S) (5 or 6 balls are needed for other sizes)
4.5 mm crochet hook.
Tapestry needle
Scissors

HOW TO MAKE THE LAGO AZUL TOP?
SIZE: S
The Top is worked in 2 parts: the upper part, made up of 2 equal rectangles, and the lower part, made up of 2 squares.
*Detailed instructions for crocheting the top in size S; for other sizes, you can purchase the pattern here: https://bit.ly/3wyPtjI
ABBREVIATIONS
ch: chain
dc: double crochet
R: row
os1: open stitch 1
os2: open stitch 2
sl st: slip stitch
PATTERN
The Top is worked in 2 parts: the upper part, made up of 2 equal rectangles, and the lower part, made up of 2 squares.

Let's start with the upper part:
Make 99 chains measuring 70 cm for size S.
Following rows:
Work the rectangle in "lemon" stitch as follows:
R1: knit 1 sc, 1 dc, 1 sc, 1 dc to the end.
R2: knit 1 dc, 1 sc, 1 dc, 1 sc, that is, where we had knitted 1 sc in the previous row, now we make 1 dc, and where we had knitted 1 dc in the previous row, now we make 1 sc. The first sc of each row starts with 1 ch that does not count as a stitch. The first dc of each row is made by making 3 ch that do count as 1 dc.

Crochet 21 rows measuring 15 cm for size S.
To complete our rectangle, we make 2 openwork rows as follows:
R1: Make 3 ch that equal 1 dc, skip 2 stitches and in the third crochet *1 dc, 2 ch, 1 dc* (V-stitch), skip 3 stitches and in the fourth repeat *_* until only 3 final stitches remain, skip 2 stitches and in the last one crochet 1 dc.
R2: Repeat R1, making 1 dc at the beginning and another at the end, and a "V" (1 dc, 2 ch, 1 dc) in each V-stitch of the previous row.
Chart for size S of the upper part:
21 rows of 99 chains in lemon stitch + 2 openwork rows measuring 70 cm

Enlarged detail of the upper part, for all sizes:

TURN THIS PIECE 180º


We are going to make a square, count 21 stitches from the right end and insert the crochet hook into the next one (stitch 22) to start the square.
We begin to crochet the lower square: The first row we will make it taking only the back loop of the stitch, as seen in
these images:

R1: 56 dc, taking only the back loop.
R2: 1 dc in each stitch.
R3: Make 3 ch that equal 1 dc, 4 dc, open stitch 1 (os1): *1 dc, 1 ch, 1 dc, 1 ch, 1 dc*, 9 dc, os1... until the end of the row when 4 dc remain, make 1 dc in each stitch.
R4: Crochet 3 ch that equal 1 dc, 3 dc, open stitch 2 (os2): *2 dc, 1 ch, 2 dc*, 9 double crochet stitches, os2... until the end of the row when 5 dc remain, make 1 dc in each stitch.
R5-6: Make 1 dc in each stitch.
R7: Make 3 ch that equal 1 dc, 7 dc, os1: *1 dc, 1 ch, 1 dc, 1 ch, 1 dc*, 9 dc, os1... until the end of the row when 1 dc remains, make 1 dc.
R8: Crochet 3 ch that equal 1 dc, os2: *2 dc, 1 ch, 2 dc*, 9 dc, os2... until the end of the row when 8 dc remain, make 1 dc in each stitch.
R9-10: Make 1 dc in each stitch.
R11: Crochet as row 3.
R12: Crochet as row 4.
R13-14: Crochet as rows 5 and 6.
R15: Crochet as row 7.
R16: Crochet as row 8.
R17-18: Crochet as rows 9 and 10.
R19: Crochet as row 3.
R20: Crochet as row 4.
R21-22: Crochet as rows 5 and 6.
We get a square of 56 stitches x 22 rows measuring 36 cm x 25 cm.
Chart for each size of the lower part:

Enlarged detail of the lower part for all sizes:

We now have the front part; make another part exactly like this for the back.
Full top chart:

Assembly:
Sew the top part of the top through the "openwork" part; as follows: at the first end, make 2 or three stitches.
Leave about 20 cm unsewn and make about 5 or 6 stitches, leave about 35 cm unsewn (this part forms the neck) and make about 5 or 6 stitches, leave about 20 cm unsewn and make 2 or 3 stitches.
These measurements are approximate and must be adjusted to each size, taking into account, above all, that the central part, the neck part, is centered and seated on the shoulders and allows the head to be inserted widely.
Turn the work and on the "dense" part of the rectangles that form the top, sew to create the sleeves, and continue sewing the sides all the way to the end.

Decoration:
Final R: Make a final row on the bottom part as follows: 4 ch, 1 sc, 4 ch, skip 3 stitches and in the 4th make 1 sl st, and repeat to the end.
At the division between the upper and lower parts, crochet a row similar to the final R (inserting the crochet hook into the loop left free when crocheting R1 by taking only the back loop of the square): 4 ch, 1 sc, 4 ch, skip 3 stitches and in the 4th make 1 sl st, and repeat to the end.

Detail of how and where to add the decorative rows:

Your top is finished! Congratulations! I hope you enjoyed making this project.
FINAL RESULT


Leave a comment
This site is protected by hCaptcha and the hCaptcha Privacy Policy and Terms of Service apply.