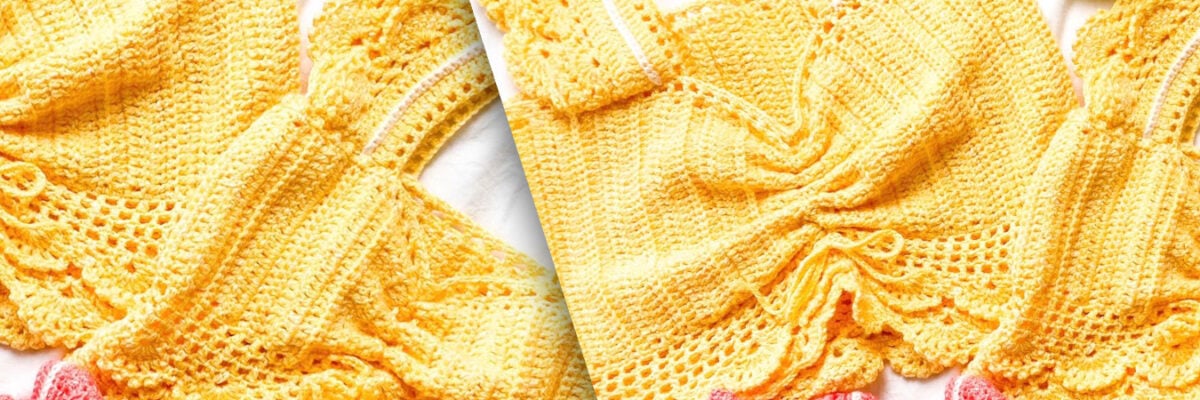
With Lana Rubí Mini Universe, you can create the perfect projects for you and your little ones. Are you joining the "mini me" trend? Get inspired with this pattern from Kiwi Hilo Creaciones.
MATERIALS
Lana Rubí Mini – Universe yarn, we used (002 Ecru – 003 Yellow).
Crochet hook #2.5 mm.
Yarn needle.
Measuring tape.
Scissors.
PATTERN
DIFFICULTY: 3
STITCHES, SYMBOLS, AND ABBREVIATIONS
Ch = Chain.
Sl st = Slip stitch.
Sc = Single crochet.
Hdc = Half double crochet.
Dc = Double crochet.
Bp dc = Back post double crochet.
Picot st.
Lace st.
7-dc fan st.
R. = Round.
STEP BY STEP
Part 1 – Top:
¨Size L¨
Measurements to take:
- Bust circumference.
- Desired blouse length.

– Make a slip knot and chain as many as needed for the desired height of our blouse. (Stella Mom Blouse approx. 34 Ch. (21cm).
R1: Ch 3 and make 34 Dc.
R2: Same as R1.
R3: Same as R1.
R4: Ch 1 and make 34 Sc.
R5: Ch 3 and work 34 Dc, working into the back of the stitch from the previous row.
– Repeat these 5 rounds until the desired width is reached, and the last round is worked in Sc.
– To close the two ends (sides), join both sides with slip stitches or by sewing with a yarn needle. In our case, we made 84 rounds and closed our work on the 85th round.
– Finally, work 1 round of Sc on both the top and bottom of the piece.
– Our first piece is finished.
Part 2 – Sleeves:
Measurements to take:
- Shoulder length.
- Desired sleeve length.

A
- Work 1 round of Lace St around Piece #1 – The Top – both above and below.
Explanation of Lace St:
– Ch 4, make a Dc, skip 1 st, and work into the next st. Repeat this all around the R until the end and close with a Sl St in the 3rd Ch).
B
- We work the sleeves separately and then join them to Piece #1.
- Chain 60 (33cm for Stella Mom Blouse) and begin to crochet the sleeves.
- R1: Work 1 R of Lace St.
- R2: Ch 3 and work 60 Dc.
- R3: Ch 1 and make 60 Sc.
- R4: Ch 3 and work 60 Dc, working into the back of the stitch from the previous row.
- R5: Repeat R2.
- Continue with the Fancy Stitch, which is a combination of the Fan St and Picot St.
Explanation of Fancy Stitch (FS):
– Ch 1 and make 1 Sc in the 1st st from the hook, Ch 3.
– Skip 1 st and make 1 Sc in the next Ch (repeat until you have 3 small loops).
– Yarn over, skip 1 st, and in the next st make 1 Dc, Ch 3, and make another Dc in the same st, thus forming a V.
– After the 2nd Dc, skip 1 st and make 1 Sc / Ch 3, skip 1 st and make 1 Sc, until 3 small loops are formed, and repeat this sequence, ending with a Sc.

– Ch 1, turn, in the 1st Sc make another Sc, skip 1 small loop and make a Sc in the next small loop. Then Ch 3 / 1 Sc in the next small loop, thus obtaining 2 small loops.
– Upon reaching the V formed in the previous Round, work 7 Dc into it, after making the fan, close it in the first small loop with 1 Sc, repeat Ch 3 / 1 Sc / Ch 3 / 1 Sc, there should be 2 small loops between each fan.
– Repeat until the end of the round, which should end like the beginning with two small loops and a Sc in the last Sc.

– Ch 1, turn and make 1 Sc in the 1st Sc.
– Continue with another Sc in the next small loop, Ch 3 / 1 Sc in the next small loop.
– Make a Dc in the 1st Dc of the fan.
– Then Ch 3 and make 1 Picot St.
Explanation of Picot St:
- This stitch is made by chaining 3, and then making 1 Sc in the same base stitch of the 3 Ch.
CONTINUING with R3:
– Make a Dc followed by 1 Picot St over each Dc of the R2 fan, and in the last Dc of the fan, make 1 Dc.
–
– Go directly to the 1st small loop and make 1 Sc / Ch 3 / 1 Sc and begin to repeat the Dc stitches in the fan with the Picot St, between each fan we will only have one small loop.
– Finish with Sc in the next small loop, Ch 3, and 1 Sc in the last Sc.
– Ch 1, turn and make a Sc in the 1st Sc of R3.
– Then Ch 3 / 1 Sc in the small loop of R3.
– Yarn over and, without any chain separation, make 1 Bp Dc (back post double crochet).
Explanation of Bp Dc (back post double crochet)
- This is done by yarning over and inserting the hook behind or in front of the work (depending on the right side of the sleeve) of the previous Dc from right to left, yarn over and pull through 2 loops twice to form a Dc.
CONTINUING with R4:
– In the 3rd, 4th, and 5th Dc, make 3 Bp Dc (back post double crochet) or Fp Dc (front post double crochet) as appropriate, skip 1 st and make Ch 3 and 1 Bp Dc in the 7th St, without any chain separation, continue with the same sequence in the following fans, until the round is finished with a Sc.
– Repeat the sequence of R1, R2, and R3.
Part 3: Bottom of the Blouse.
– After having worked the Sc round, continue with 4 rounds of Lace St.
– In R5, make the same Fancy St as used for the sleeves.
– The length will be whatever you desire.
Finishing
Crochet a row of chains to the desired length. Once finished, weave it through the join of Piece #1 (Top)
Starting from the Lace Stitches upwards every 3 or 4 Dc and return on the other side of the join downwards until reaching the Lace Stitches and it will be ready to tie and make a bow.
RESULT