


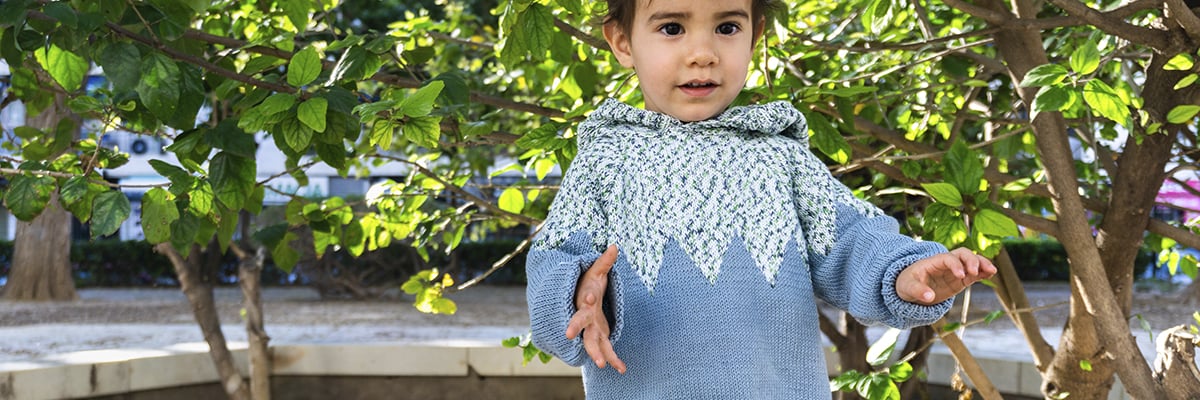
Fort Apache Vest
This vest knitted by Made in Rox is the perfect accessory to make a splash this season. What would you pair it with? If you want to know more, check out this new pattern!
Materials
Rubí Ciao. Gray Color (119). 4 balls.
Rubí Ciao. Yellow Color (103). 1 ball.
5 mm crochet hook.
Stitch markers.
Tapestry needle.
Scissors.
Measurements and gauge
Pattern suitable for size M. Please refer to the following approximate measurements:

Instructions are provided throughout the pattern to modify it and adapt it to different sizes.
It is important that before starting, you make a gauge swatch in double crochet to determine if you need to change the hook size to obtain the correct vest measurements. The gauge in this case corresponds to: 15 stitches x 9 rows = 10 x 10 cm.
Instructions
The vest is constructed from a single piece. You start working from bottom to top, passing through the design area, which is made using the tapestry technique, working rows in double crochet. At a certain height, three areas are distinguished on this main piece: the back and the two fronts. Once these three parts are finished, you have a single piece like the following:

At this point, simply fold the piece (along the pink lines in the image), join the shoulders (green marks in the image) and make a single crochet border to finish the work.
Stitches and abbreviations
Ch = chain
Sl st = slip stitch
Dc = double crochet
Sc = single crochet
3Dc tog = 3 double crochet together, meaning a double decrease.
HOW TO MAKE THE FORT APACHE VEST
We work with Rubi Ciao color 119 and a 5mm crochet hook.
BODY
We start by making 145 Ch.
R1: 2 Ch (does not count as first Dc) + (skipping these two ch and starting to crochet in the third) 145 Dc.
R2 – R4: 2 Ch (does not count as first Dc) + 145 Dc.
From row 5 to row 13, we need to create the design by combining the yarn we have worked with so far and Rubi Ciao color 103 using the tapestry technique and following the chart below:

I will describe these rows below for clarity:
R5: 2 Ch (does not count as first Dc) + 5 gray Dc + [2 yellow Dc + 17 gray Dc] x 7 + 2 yellow Dc + 5 gray Dc.
R6: 2 Ch (does not count as first Dc) + 4 gray Dc + [4 yellow Dc + 15 gray Dc] x 7 + 4 yellow Dc + 4 gray Dc.
R7: 2 Ch (does not count as first Dc) + 3 gray Dc + [2 yellow Dc + 2 gray Dc + 2 yellow Dc + 6 gray Dc + 1 yellow Dc + 6 gray Dc] x 7 + 2 yellow Dc + 2 gray Dc + 2 yellow Dc + 3 gray Dc.
R8: 2 Ch (does not count as first Dc) + 2 gray Dc + [2 yellow Dc + 4 gray Dc + 2 yellow Dc + 4 gray Dc + 3 yellow Dc + 4 gray Dc] x 7 + 2 yellow Dc + 4 gray Dc + 2 yellow Dc + 2 gray Dc.
R9: 2 Ch (does not count as first Dc) + 1 gray Dc + [2 yellow Dc + 6 gray Dc + 2 yellow Dc + 2 gray Dc + 5 yellow Dc + 2 gray Dc] x 7 + 2 yellow Dc + 6 gray Dc + 2 yellow Dc + 1 gray Dc.
R10: repeat R8.
R11: repeat R7.
R12: repeat R6.
R13: repeat R5.
After this design section, we continue with rows of double crochet in gray.
R14 – R30: 2 Ch (does not count as first Dc) + 145 Dc.
At this point, we need to distinguish the construction of three different areas: the right front, the left front, and the back. To distinguish these three areas, we will use stitch markers to indicate which stitches from this last row we will use to construct each of the three parts. Place the markers at stitches: 1, 30, 41, 105, 116, and 145.
Between stitches 1 and 30, we will construct the right front; between stitches 41 and 105, the back; and between stitches 116 and 145, the left front.
RIGHT FRONT
Without cutting the yarn from the part already knitted, we will work on the side where we left off, making short rows.
This front is constructed between the markers we placed at stitches 1 and 30.
R31: 2 Ch (does not count as first Dc) + 3 Dc tog + 27 Dc.
R32: 2 Ch (does not count as first Dc) + 25 Dc + 3 Dc tog.
R33: 2 Ch (does not count as first Dc) + 3 Dc tog + 23 Dc.
R34: 2 Ch (does not count as first Dc) + 21 Dc + 3 Dc tog.
R35: 2 Ch (does not count as first Dc) + 3 Dc tog + 19 Dc.
R36: 2 Ch (does not count as first Dc) + 17 Dc + 3 Dc tog.
R37: 2 Ch (does not count as first Dc) + 3 Dc tog + 15 Dc.
R38: 2 Ch (does not count as first Dc) + 13 Dc + 3 Dc tog.
R39 – R48: 2 Ch (does not count as first Dc) + 14 Dc.
Cut the yarn and continue with the other front, picking up the stitches between the markers placed in row 30.
LEFT FRONT
At the marker that indicated stitch 116 of row 30, we begin to work towards stitch 145 with a new strand of yarn, and this time we will do the same as in the right front, symmetrically.
R31: 2 Ch (does not count as first Dc) + 27 Dc + 3 Dc tog.
R32: 2 Ch (does not count as first Dc) + 3 Dc tog + 25 Dc.
R33: 2 Ch (does not count as first Dc) + 23 Dc + 3 Dc tog.
R34: 2 Ch (does not count as first Dc) + 3 Dc tog + 21 Dc.
R35: 2 Ch (does not count as first Dc) + 19 Dc + 3 Dc tog.
R36: 2 Ch (does not count as first Dc) + 3 Dc tog + 17 Dc.
R37: 2 Ch (does not count as first Dc) + 15 Dc + 3 Dc tog.
R38: 2 Ch (does not count as first Dc) + 3 Dc tog + 13 Dc.
R39 – R48: 2 Ch (does not count as first Dc) + 14 Dc.
Cut the yarn and continue with the back of the vest, picking up the stitches that were between the markers placed in row 30.
BACK
At the marker indicating stitch 41 of row 30, we begin to work towards stitch 105 with a new strand of yarn and make the following rows:
R31 – R46: 2 Ch (does not count as first Dc) + 65 Dc.
At this point, we need to shape the shoulders:
R47: 2 Ch (does not count as first Dc) + 14 Dc.
R48: Repeat R47.
We do the same on the other end, on the last 14 stitches, to shape the other shoulder.
JOINING AND EDGES
Fold the piece to join the shoulder sections. We do this with the help of a tapestry needle.
Picking up the yellow yarn again, we will make a single crochet border all around the piece. To do this, start at the bottom of the right front and work single crochet stitches around the entire piece, passing through the right front, the neck, the left front, and the entire bottom of the vest until you reach the starting point. Finish with a slip stitch into the first single crochet and fasten off with the help of a tapestry needle. Do the same for the sleeve areas to obtain a uniform yellow border.
Finally, weave in any remaining ends and trim the yarn tails.
Size adaptations
If you want to adapt the pattern to make larger or smaller sizes, keep the following in mind:
- To achieve a longer/shorter vest, you can make more/fewer repetitions in the body rows. Instead of working up to row 30, you can make more or fewer rows depending on the desired length.
- To achieve a wider/narrower vest, you can start the body of the vest with more/fewer chains and the same with the number of double crochet stitches in each row. Here you will need to modify the tapestry design: to make it square, add as many rows to the right as to the left of the design.
If you do this, you must consider how many stitches will form part of the fronts and how many of the back once you divide the body piece: the number of back stitches should be slightly greater than the sum of stitches you leave for the fronts.
FINAL RESULT


