

Two-sided pajama bag
Today we bring you the original two-sided pajama bag, an exclusive design by El taller de mamá. Do you dare? Let's go for it! If you want to know more, you can download this PDF.
MATERIALS
2 balls of Rubi Supercotton, white
A small amount of cotton in black and orange for details
Crochet hooks 3mm and 4.5mm
Yarn needle
Two invisible snap fasteners
Choose your favorite colors through our website.
HOW TO MAKE THE TWO-SIDED PAJAMA BAG?
PATTERN
The main part of this project consists of two identical pieces, one in pink and the other in grey. But each of the parts will be made with two strands: we will take one strand of pink Bubble and one of white Supercotton. We will work with both strands together.
Start one of the two parts with a 4.5mm hook; remember that you need to make two, one of each color, which will then be sewn together with a yarn needle, leaving the straight part open, and we will sew it with white Supercotton thread.
1.- Ø 3 chain stitches, 11dc (12) We will not close the magic ring, but when we have the 12 dc, we will turn the work and crochet in a fan shape.
2.- 3ch, (1inc, 1dc)x5, 1incdc (18)
3.- 3ch, 1dc, (1inc, 2dc)x5, 1inc (24)
4.- 3ch, 2dc, (1inc, 3dc)x5, 1inc (30)
5.- 3ch, 3dc, (1inc, 4dc)x5, 1inc (36)
6.- 3ch, 4dc, (1inc, 5dc)x5, 1inc (42)
7.- 3ch, 5dc, (1inc, 6dc)x5, 1inc (48)
8.- 3ch, 6dc, (1inc, 7dc)x5, 1inc (54)
9.- 3ch, 7dc, (1inc, 8dc)x5, 1inc (60)
10.- 3ch, 8dc, (1inc, 9dc)x5, 1inc (66)
11.- 3ch, 9dc, (1inc, 10dc)x5, 1inc (72)
From here, we will not continue on the circular part, making a fan, but we will turn to the other side and pick up the stitches along the straight part that we have left from crocheting.
12.- 3ch, 44dc (45)
13-21.- 3ch, 44dc (45)
We now have the first part, and the second part is exactly the same.
Then we will sew them along the contour of the circular part, leaving the straight part open as an opening to store the pajamas.
Details: We will work the details only in cotton and with a 3mm hook.
BEAK (X2)
1.- 8 ch (1ch to turn) Turn the work at the end of each row.
2.- 8 sc (1ch to turn)
3.- Skip the first stitch, 7 sc (1ch to turn).
4.- Skip the first stitch, 6 sc (1ch to turn)
5.- Skip the first stitch, 5 sc (1ch to turn)
6.- Skip the first stitch, 4 sc (1ch to turn)
7.- Skip the first stitch, 3 sc (1ch to turn)
8.- Skip the first stitch, 2 sc (1ch to turn)
Finish with 1 sc all around the edge.
EARS (X2)
1.- Ø 4sc (4)
2.- 1incx4 (8)
3.- 8sc (8)
4.- *1sc, 1inc* (12)
5.- 12sc (12)
6.- *2sc, 1inc*(16)
7.- 16sc (16)
8.- *3sc, 1inc* (20)
9.- 20sc (20)
10.- *4sc, 1inc* (24)
11.- 24sc (24)
12.- *5sc, 1inc* (28)
13-14.- 28 (28)
FEET (X2)
1.- Ø 6sc (6)
2.- 1inc x6 (12)
3.- *1sc, 1inc* (18)
4.- *2sc, 1inc* (24)
5-7.- 24sc (24)
8.- *2sc, 1dec* (18)
9-10.- 18sc (18)
EYES (X4)
We are going to make 4, two completely white and two starting in black up to round 2 and then continuing in white.
1.- Ø 6sc(6)
2.- 1 inc x6 (12)
3.- *1sc, 1inc* (18)
4.- *2sc, 1inc* (24)
5.- *3sc, 1inc* (30)
6.- *4sc, 1inc* (36)
7.- *5sc, 1inc* (42)
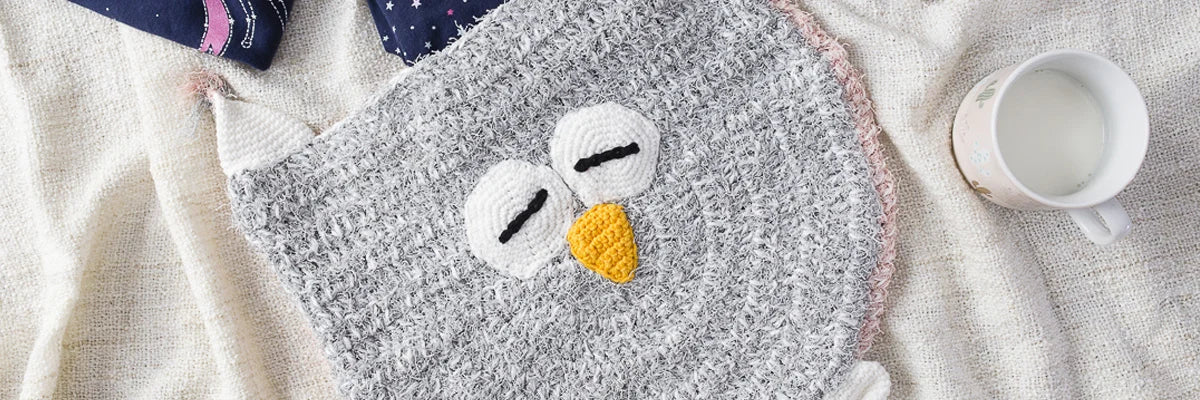
Once we have all the pieces, we will sew them in place. On the eyes that are completely white, we will embroider the black line, which simulates the sleeping eyes of the owl. And finally, we will sew two invisible snap fasteners into the opening so that nothing falls out.
RESULT


